
The Complete Hetzner VPS Setup Guide for Indie Developers
This guide walks you through turning a fresh Hetzner VPS into a production-ready Django server. There is no Docker complexity, no Kubernetes rabbit holes ... just a solid server that works and costs almost nothing to run.
By the end, you'll have: - Secure Django server with SSL certificates - PostgreSQL database with remote access - Automated process management that restarts your app if it crashes - Everything ready for vibeservering (coding directly on your server from anywhere)
What This Guide Will Do
This comprehensive guide will set up a production-ready server for a Django web application with the following stack:
- Web Framework: Django with Gunicorn WSGI server
- Database: PostgreSQL with external access capability
- Web Server: Nginx as reverse proxy with SSL/TLS termination
- CSS Framework: Tailwind CSS build pipeline with Node.js
- Process Management: Supervisor for automatic service management
- Security: UFW firewall, SSH key authentication, Let's Encrypt SSL certificates
- Monitoring: Centralized logging and web-based process monitoring
By the end of this guide, you'll have a secure, scalable server that automatically manages your Django application, serves static files efficiently, and provides SSL-encrypted access to your users.

Prerequisites
- Hetzner Cloud account
- Domain name (required for SSL setup)
Generate SSH Key Pair
You need an SSH key pair for secure authentication. The public key gets uploaded to Hetzner, while the private key stays on your local machine.
# Generate new SSH key pair
ssh-keygen -t rsa -b 4096 -C "your-email@example.com"

# View the public key (copy this to Hetzner)
cat ~/.ssh/id_rsa.pub
The public key (~/.ssh/id_rsa.pub) gets uploaded to Hetzner during server creation. The private key (~/.ssh/id_rsa) stays on your local machine for authentication.
Step 1: Create Hetzner VPS
Server Configuration
- Log in to Hetzner Cloud Console
- Create new server:
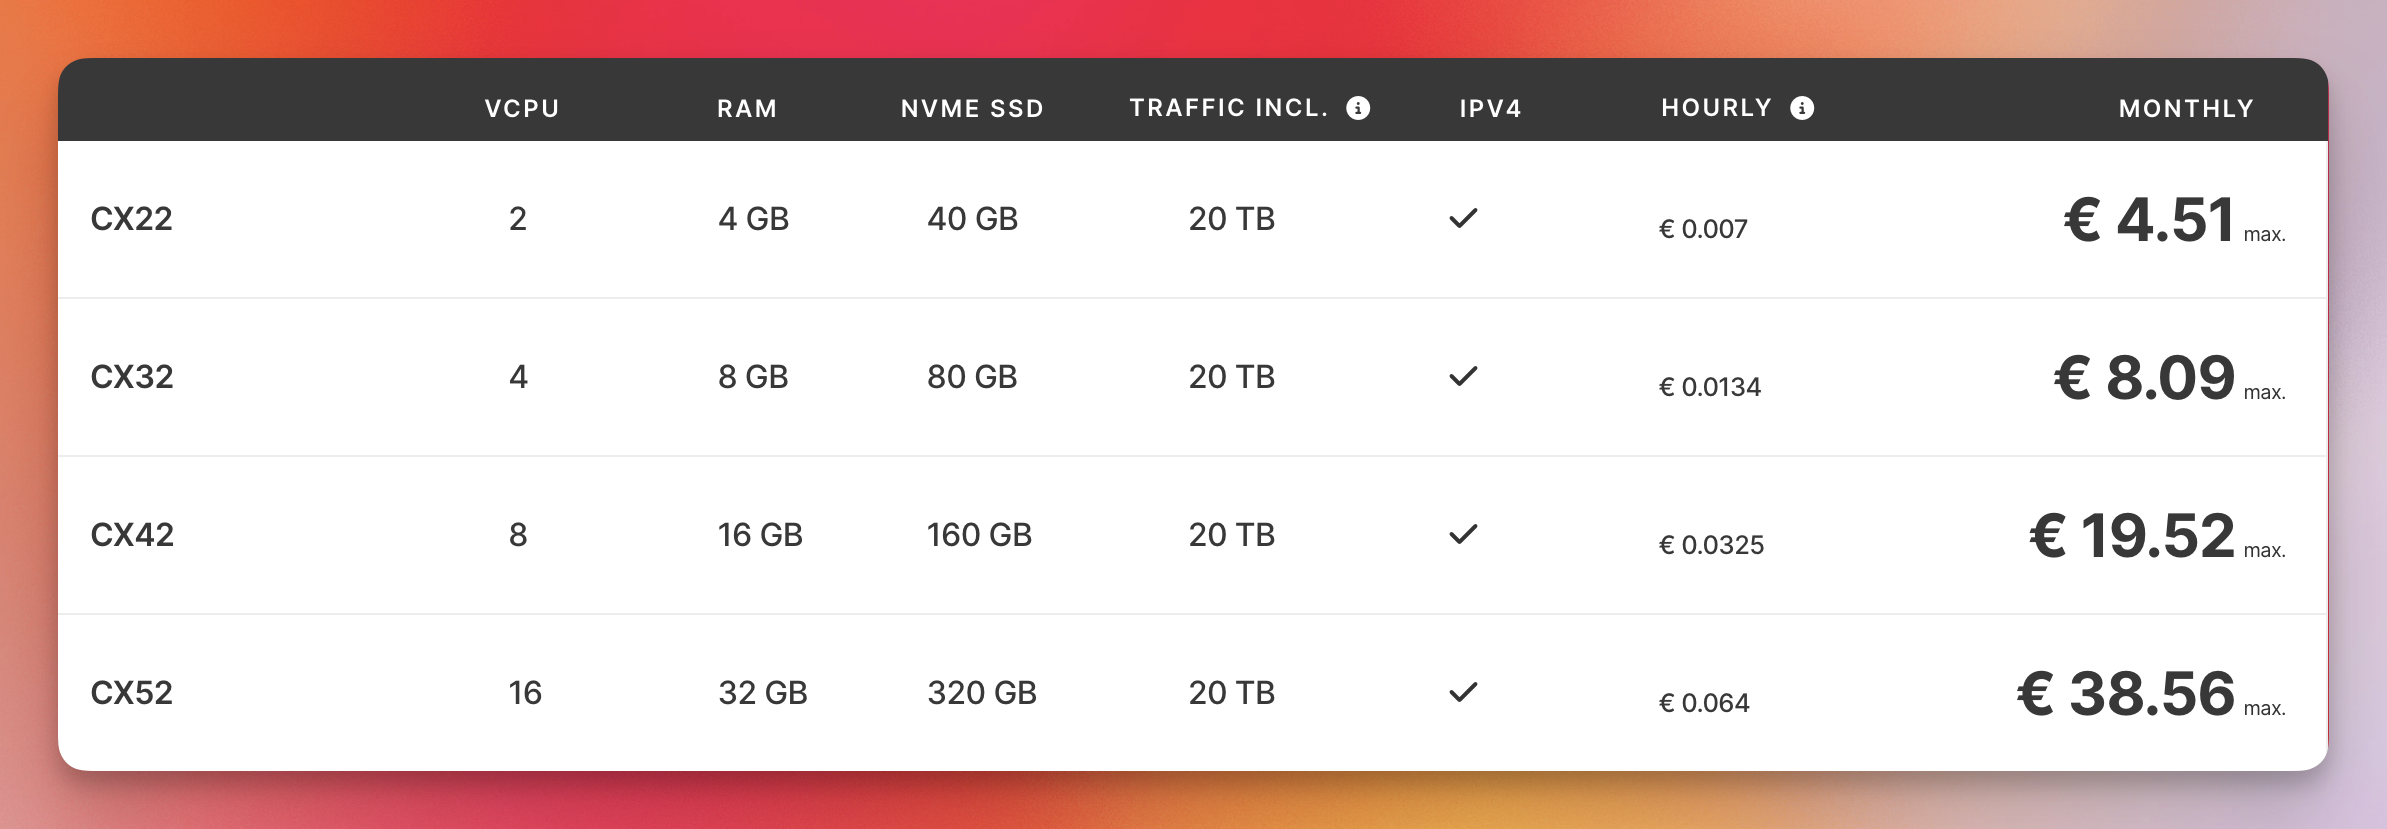
- Type: whatever suits your needs. I picked CX32 (4 vCPUs, 8GB RAM, 80GB) for Indiequery.
- Location: whatever is closest to your users. I picked Nuremberg for Indiequery.
- OS: Ubuntu 24.04 LTS
- SSH Key: Upload your public SSH key
- Name:
your-project-name(with additional qualifiers if you need multiple servers) - Note the server IP address (will be used throughout setup)
Cost
- Monthly cost: €5.99/month
- Includes 20TB monthly traffic
Step 2: Initial Server Access & Security
Connect to Server via SSH
Once your server is created, connect to it as the root user to begin the initial setup and security configuration.
# Replace IP_ADDRESS with your server's actual IP
ssh root@IP_ADDRESS
Update System
First, update the system packages and install essential utilities we'll need throughout the setup process.
apt update && apt upgrade -y
# Install essential utilities: downloading files, version control, text editing, process monitoring, archive extraction
apt install -y curl wget git nano htop unzip

# Install GitHub CLI
curl -fsSL https://cli.github.com/packages/githubcli-archive-keyring.gpg | dd of=/usr/share/keyrings/githubcli-archive-keyring.gpg
chmod go+r /usr/share/keyrings/githubcli-archive-keyring.gpg
echo "deb [arch=$(dpkg --print-architecture) signed-by=/usr/share/keyrings/githubcli-archive-keyring.gpg] https://cli.github.com/packages stable main" | tee /etc/apt/sources.list.d/github-cli.list > /deploy/null
apt update
apt install -y gh
Create Development User
Create a non-root user for running the application. This follows the principle of least privilege and improves security.
# Create deploy user
adduser deploy
# Add deploy user to www-data group for web server file permissions
usermod -aG www-data deploy

# Set up SSH key for deploy user
mkdir -p /home/deploy/.ssh
cp /root/.ssh/authorized_keys /home/deploy/.ssh/
chown -R deploy:deploy /home/deploy/.ssh
chmod 700 /home/deploy/.ssh
chmod 600 /home/deploy/.ssh/authorized_keys
Configure Firewall
Set up UFW firewall to block unauthorized access and only allow the specific ports your application needs.
# Install UFW firewall
apt install -y ufw

# Allow necessary ports
ufw allow ssh      # Port 22
ufw allow http     # Port 80
ufw allow https    # Port 443
ufw allow 5432     # PostgreSQL

# Enable firewall
ufw --force enable
Step 3: Install Core Dependencies
Python Environment
Install Python 3 and deployelopment tools needed for Django and package compilation.
# Install Python and pip
apt install -y python3 python3-pip python3-venv python3-deploy

# Install build dependencies
apt install -y build-essential libpq-deploy
Node.js (for Tailwind CSS)
Install Node.js for building CSS assets with Tailwind CSS.
# Install Node.js 20.x
curl -fsSL https://deb.nodesource.com/setup_20.x | bash -
apt install -y nodejs
PostgreSQL Server
Install and start PostgreSQL database server for storing application data.
# Install PostgreSQL
apt install -y postgresql postgresql-contrib

# Start and enable PostgreSQL
systemctl start postgresql
systemctl enable postgresql
Nginx Web Server
Install Nginx as a reverse proxy and to serve static files.
# Install Nginx
apt install -y nginx

# Start and enable Nginx
systemctl start nginx
systemctl enable nginx
Supervisor Process Manager
Install Supervisor to manage and monitor application processes automatically.
# Install Supervisor
apt install -y supervisor

# Start and enable Supervisor
systemctl start supervisor
systemctl enable supervisor
Step 4: Configure PostgreSQL
Database Setup
Create the main application database and user with appropriate privileges.
# Switch to postgres user
sudo -u postgres psql

# Create database and user (replace with your credentials)
CREATE DATABASE <pick_a_database_name>;
CREATE USER <pick_a_username> WITH PASSWORD '<pick_a_secure_password>';
GRANT ALL PRIVILEGES ON DATABASE pick_a_database_name TO pick_a_username;
\q
Configure External Access
Configure PostgreSQL to accept external connections for remote database access.
# Edit PostgreSQL configuration
nano /etc/postgresql/16/main/postgresql.conf

# Change listen_addresses (around line 59)
listen_addresses = '*'

# Edit host-based authentication
nano /etc/postgresql/16/main/pg_hba.conf

# Add this line at the end for external connections
host all all 0.0.0.0/0 scram-sha-256

# Restart PostgreSQL
systemctl restart postgresql
Step 5: Application Setup
Create Application Directory
Set up the main directory structure for your application and switch to the deploy user.
# Create project directory
mkdir -p /opt/your-project
chown deploy:deploy /opt/your-project

# Switch to deploy user for remaining steps
su - deploy
cd /opt/your-project
Clone Repository
Download your application code from your repository or create the basic directory structure.
# Clone your repository (replace with your repo URL)
git clone https://github.com/yourusername/your-project.git .

# Or if starting fresh, create basic structure
mkdir -p templates static/css
Python Virtual Environment
Create an isolated Python environment and install the required packages.
# Create virtual environment
python3 -m venv venv
source venv/bin/activate

# Install Python dependencies (adjust as needed)
pip install django gunicorn psycopg2-binary python-dotenv
Step 6: Configure Supervisor
Create Supervisor Configuration
Switch back to root user and create the supervisor configuration file to manage application processes.
# Switch back to root for system configuration
exit  # Exit deploy user session

# Create supervisor configuration
nano /etc/supervisor/conf.d/your-project.conf
Supervisor Configuration Content
[program:your-project-web]
command=/opt/your-project/venv/bin/gunicorn --bind 127.0.0.1:8000 your-project.wsgi:application
directory=/opt/your-project
user=deploy
autostart=true
autorestart=true
redirect_stderr=true
stdout_logfile=/var/log/supervisor/your-project-web.log
stderr_logfile=/var/log/supervisor/your-project-web-error.log
Configure Supervisor Web Interface
Enable the web-based monitoring interface for Supervisor and set up user permissions.
# Edit supervisor main config
nano /etc/supervisor/supervisord.conf

# Add or modify these sections:
[inet_http_server]
port=127.0.0.1:9001
username=admin
password=<pick-a-secure-password>

[supervisorctl]
serverurl=http://127.0.0.1:9001
username=admin
password=<pick-a-secure-password>

# Set permissions for deploy user access
chmod 0766 /var/run/supervisor.sock
chown root:deploy /var/run/supervisor.sock
Start Supervisor Processes
Load the configuration and start all managed processes.
# Reload supervisor configuration
supervisorctl reread
supervisorctl update

# Start all processes
supervisorctl start all

# Check status
supervisorctl status
Step 7: Configure Nginx
Create Nginx Site Configuration
Create the nginx configuration file for your domain.
# Create nginx configuration
nano /etc/nginx/sites-available/your-project
Nginx Configuration Content
# YourProject Nginx Configuration
# HTTP configuration (HTTPS will be added by certbot)

server {
    listen 80;
    server_name yourdomain.com www.yourdomain.com;

    # Security headers
    add_header X-Frame-Options DENY;
    add_header X-Content-Type-Options nosniff;
    add_header X-XSS-Protection "1; mode=block";
    add_header Referrer-Policy "strict-origin-when-cross-origin";

    # Gzip compression
    gzip on;
    gzip_vary on;
    gzip_min_length 1024;
    gzip_proxied expired no-cache no-store private auth;
    gzip_types text/plain text/css application/json application/javascript text/xml application/xml application/xml+rss text/javascript;

    # Static files
    location /static/ {
        alias /opt/your-project/staticfiles/;
        expires 1y;
        add_header Cache-Control "public, immutable";
    }

    # Media files
    location /media/ {
        alias /opt/your-project/media/;
        expires 1y;
        add_header Cache-Control "public, immutable";
    }

    # Supervisor web UI
    location /supervisor/ {
        proxy_pass http://127.0.0.1:9001/;
        proxy_set_header Host $host;
        proxy_set_header X-Real-IP $remote_addr;
        proxy_set_header X-Forwarded-For $proxy_add_x_forwarded_for;
        proxy_set_header X-Forwarded-Proto $scheme;
    }

    # Main Django application
    location / {
        proxy_pass http://127.0.0.1:8000;
        proxy_set_header Host $host;
        proxy_set_header X-Real-IP $remote_addr;
        proxy_set_header X-Forwarded-For $proxy_add_x_forwarded_for;
        proxy_set_header X-Forwarded-Proto $scheme;

        # WebSocket support
        proxy_http_version 1.1;
        proxy_set_header Upgrade $http_upgrade;
        proxy_set_header Connection "upgrade";

        # Timeouts
        proxy_connect_timeout 60s;
        proxy_send_timeout 60s;
        proxy_read_timeout 60s;

        # Buffer settings
        proxy_buffering on;
        proxy_buffer_size 128k;
        proxy_buffers 4 256k;
        proxy_busy_buffers_size 256k;
    }

    # Deny access to sensitive files
    location ~ /\. {
        deny all;
        access_log off;
        log_not_found off;
    }

    location ~ ^/(requirements\.txt|\.env|manage\.py)$ {
        deny all;
        access_log off;
        log_not_found off;
    }
}
Enable Nginx Site
Activate your site configuration and remove the default nginx page.
# Enable the site
ln -s /etc/nginx/sites-available/your-project /etc/nginx/sites-enabled/

# Remove default site
rm -f /etc/nginx/sites-enabled/default

# Test configuration
nginx -t

# Reload nginx
systemctl reload nginx
Step 8: Domain & SSL Setup
DNS Configuration
- Point your domain to the server IP:
- A record:
yourdomain.com→YOUR_SERVER_IP - A record:
www.yourdomain.com→YOUR_SERVER_IP
Install Certbot for Let's Encrypt
Install SSL certificate management tools and get free SSL certificates from Let's Encrypt.
# Install certbot
apt install -y certbot python3-certbot-nginx

# Get SSL certificate
certbot --nginx -d yourdomain.com -d www.yourdomain.com --email your-email@example.com --agree-tos --non-interactive

# Test auto-renewal
certbot renew --dry-run
Enable Auto-Renewal
Ensure SSL certificates automatically renew before they expire.
# Check if timer is enabled
systemctl status certbot.timer

# Enable if not already enabled
systemctl enable certbot.timer
systemctl start certbot.timer
Test Your Setup
Your app: https://yourdomain.com
Monitoring: https://yourdomain.com/supervisor/
Database: Connect remotely on port 5432
Cost Breakdown
- Server: €5.99/month
- Domain: ~€10/year
- SSL: Free (Let's Encrypt)
- Total: ~€7/month for production-ready infrastructure
Compare that to $20+ on other platforms.
What's Next?
With this setup, you have everything needed for serious indie development:
- Production-ready security
- Automatic process management
- SSL encryption
- Remote database access
- Ready for vibeservering
Your server can handle thousands of users and grows with your project.